Elevate Your Garden: DIY Raised Bed Made Easy
- Tyler Farm
- Aug 1, 2025
- 10 min read
Yesterday we gave a handful of reasons that raised garden beds are awesome—less back pain, better soil, easier weeding… you get it. Wanna see for yourself? Here’s the link.
Go on, click it. You know you’re curious. Today, we’re rolling up our sleeves and building one.
First things first, safety isn’t just a suggestion. Seriously, put on those safety goggles unless you want a rogue wood chip taking you out. And don't even think about skipping the gloves unless you enjoy splinters (spoiler: you don’t).
Honestly, unless you’re trying to impress Bob Vila himself, chill out. You don’t have to be some DIY wizard here. Even if your last project involved more Elmer’s glue and glitter than actual tools, you’ll be fine. The real nightmare is hitting the home stretch and suddenly thinking, “Wait, did I leave that last bit in the car?”

1. What You’ll Need
Before you start, round up everything so you’re not running around mid-project, covered in sawdust, muttering curses. Here’s the list:
Materials:
40-gallon barrel
Make sure it’s food-grade. Seriously. Some barrels were used for gnarly stuff like pesticides or motor oil. If you wouldn’t eat off it, don’t grow food in it.
Three 10-foot pressure-treated 2x4s
You’ll chop these down for the frame and legs. Go pressure-treated so it doesn’t rot the first rainy season.
1-lb box of 3" exterior screws
1-lb box of 1.5" exterior screws
Bag of chunky gravel
Coarse stuff, not pea gravel. You want big pieces so water drains well.
Big bag of organic raised bed soil
Don’t cheap out here. The quality of your dirt is literally the difference between a sad tomato and a jungle of cucumbers.
Tools:
Drill/screw gun
Reciprocating saw
Tape measure
⅜" spade bit (or close enough)
Chalk line (or just wing it with a Sharpie if you’re brave)
Speed square
Sharpie marker

2. Prepping and Cutting the Barrel
Figure out where that barrel’s coming from. Don’t just trust some random online source because it says it’s “food-grade”—that’s the oldest trick in the book. If you pop the lid and it smells like chemicals, just leave it.
Grab yourself a big ol’ bucket, fill it with the hottest water you can stand, and dump in more dish soap than you’d use for your dishes. Get a brush, maybe even one of those scrubby sponges if you’re feeling fancy, and go wild. Scrub the outside, scrub the inside, get into every weird crevice—seriously, pretend you’re on a home makeover show for barrels.
Dish soap is fine, nothing fancy required, but for the love of all that is green and growing, rinse that sucker out. I’m talking rinse it like you’re prepping for a bubble-free Olympics. Unless you want your tomatoes foaming up like they’re in a sitcom bubble bath, don’t leave soap residue behind. A couple extra rinses now beats eating sudsy veggies later, trust me.
Alright, here’s the deal: just get that barrel standing nice and solid—don’t stress yourself out trying to make it perfect. Give it a little nudge if you have to. If it looks steady and isn’t about to roll off to start a new life somewhere, you’re good. Use that seam running around the middle as your guide.
Try to keep the reciprocating saw blade smack in the middle as you cut. Trust me, if you start drifting to one side, your planter’s gonna look like it just crawled out of a disaster movie, wobbling around or tilting like it’s had one too many drinks. And whatever you do, don’t go slicing through those end caps. That’s just asking for trouble. End caps are like the planter’s security system—mess with them and the whole thing falls apart, literally.
Don’t rush it. People always get impatient with saws, but if you let the blade do its thing, you get a nice, clean cut, plus you keep all your fingers attached. Oh, and please, please throw on some eye protection. Seriously, flying PVC shrapnel is nobody’s idea of a good time. Unless you’re some sort of DIY daredevil, in which case… well, good luck, but don’t say I didn’t warn you.

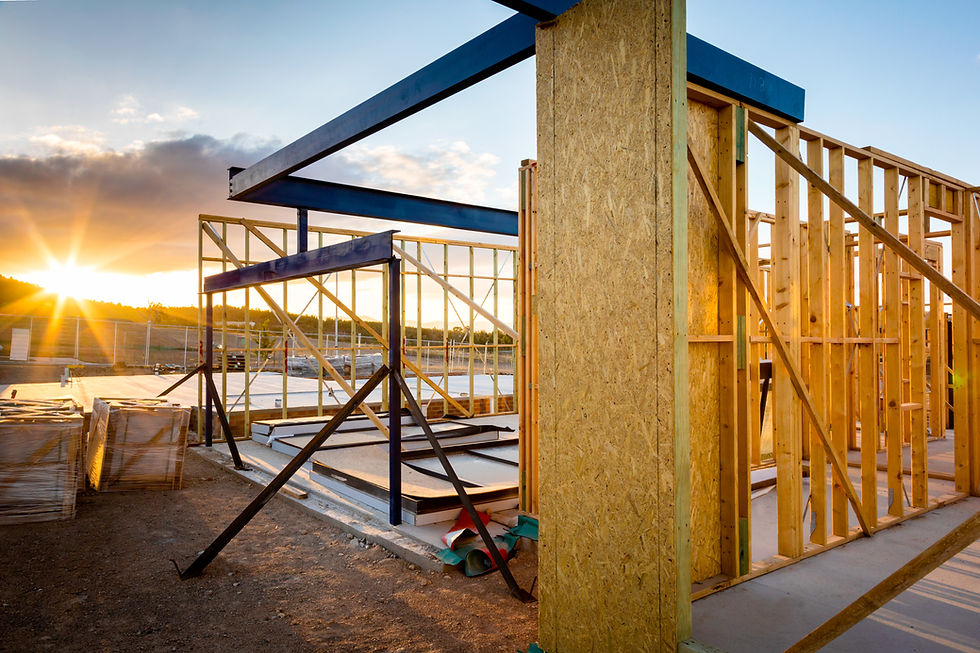
3. Framing It Up
Alright, let’s get into the nitty gritty—because if you’re gonna build something, might as well do it right.
First off, grab that tape measure like you mean it. Measure your barrel’s width and length. Write those numbers down somewhere, or at least don’t trust your memory—everyone thinks they’ll remember, but, spoiler: you probably won’t.
Alright, here’s the deal with the short sides of your frame: tack on an extra quarter inch. Trust me, you don’t wanna wrestle a frame that’s so snug it makes you question your life choices. That little sliver of space? It’s basically the VIP pass for stress-free assembly—anyone who’s ever put together IKEA furniture knows what I’m talking about.
Now, moving on to the long sides—here’s where the real wizardry happens. Grab the length of your barrel, toss on 3¼ inches, and boom, you’re golden. That sounds oddly specific, right? But there’s a reason. The long boards are supposed to overlap the short ones and you don’t want them squeezing the barrel like a boa constrictor. You want snug, not strangled.
Time for the fun (and messy) part: cutting your 2x4s to size. Safety goggles, people—unless you’re aiming for that pirate look. Sawdust is gonna go everywhere, so maybe don’t do this right before a fancy dinner.
Once your boards are all cut, lay them out on the ground. Picture a big rectangle—it’s basically adult Legos, but with more potential for splinters. Take your long boards and drive two 3-inch screws through each end, right into the short boards.
Next up, flip your cut barrel face down. Gently, unless you’re in the mood for slapstick comedy. Lower your frame over the barrel—line it up so it’s flush with the edge. Give it a little nudge if it’s stubborn, but don’t go all WWE on it.
Now, flip the whole assembly over. This might take some awkward wiggling, maybe a friend, or just a lot of determination. Once it’s right-side up, fasten the barrel to the frame. Use 1½-inch screws, space them out every 4 inches around the inside edge. Don’t cheap out—more screws = sturdier build. If you’re the cautious type, throw a few extras in for good luck.
And before you even think about calling it done—here’s the bit most people skip, but trust me, you shouldn’t. Brush or roll on some exterior wood sealer before you start screwing everything together. That one tiny move? Yeah, it’s the line between “meh, survived two storms” and “check out my masterpiece, still standing after ten years.” And let’s be real, there’s something weirdly fun about seeing water just slide right off like your project’s wearing a fancy raincoat.
So, here’s the deal: double-check your measurements, don’t get trigger-happy with the saw, toss in extra screws (trust me, future you will thank you), and for the love of all things DIY, don’t skimp on the sealer. Your future self (and your barrel) will thank you.
4. Building & Attaching the Legs
Let’s be real for a sec—nobody wants to hunch over some ankle-biter of a planter, unless you’ve got a chiropractor on speed dial. You want this thing around 36 inches tall. That’s about countertop height. Ideal for chucking in seeds or ripping out weeds without ending up hunched over like you’re prepping for your own Hunchback cosplay. If you’re tall, seriously, tack on an extra inch or two—save your back. Shorter folks? Eh, grab a step stool if you feel like it, or just wing it. Life’s too short (pun intended) to stress. The point is, 36" is the crowd-pleaser.
But here’s the thing—frames aren’t invisible. They take up about 3 inches of that height. So, subtract that from your total. If you want a 36" planter, your legs need to be 33". Yes, there’s math involved, but it’s the easy “subtract and move on” kind, not the “carry the one, cry into your calculator” kind.
Alright, lumber time. Grab those 2x4s and carve out eight pieces, each 33 inches long. Pro tip: measure twice, cut once. Or if you’re like me, measure once, cut, realize you messed up, and laugh it off. It happens.
Now, here’s where you get fancy—pair up your 2x4s and screw them together down the length so you’ve got four chunky “L” shaped legs. Not only do they look kind of cool and industrial, but they’re solid. No more wobbly nonsense. Have you ever seen a barstool at a dive bar that’s missing a screw? Yeah, we’re not doing that here.
Plop a leg on each corner of your frame, line it up as best you can (eyeballing is allowed), then drill in three 3" screws per leg, going in at a diagonal. This isn’t brain surgery; if it looks mostly right, it’s right enough. Don’t lose your mind trying to get them laser-straight. Barrels aren’t square, tables in old pubs wobble, and honestly, that’s half the charm.
If your legs end up a little crooked or the whole thing leans a bit—embrace it. Call it “rustic” or “artisanal” if anyone asks. People pay extra for that at fancy garden stores. You didn’t spend all afternoon out here sweating for flawless perfection; you did it for a rad planter with some personality. So what if it’s not straight out of a catalog? That’s how you know it’s handmade, not factory churned.
5. Stabilizing with Bracing
Alright, let’s talk about adding braces—because, trust me, wonky furniture is only cute for about five minutes. So, with the legs of your project still sticking up like they’re trying to catch a signal from outer space, grab your tape measure. Measure 8 inches down from the top of each leg and slap a mark there. Don’t stress about being laser-precise; if you’re off by a hair, no one’s judging (unless your neighbor is secretly Bob Vila).
Now, dig through your pile of leftover 2x4s. Don’t have any? Alright, time to raid that sad little pile of forgotten wood scraps chillin’ in the corner of your garage—yeah, you know the one. If you don’t want your project screaming “I was built on a caffeine bender at 2am,” maybe grab those chunky 2x4s and slice ‘em down a bit. Thinner boards = less Frankenstein, more #craftgoals. Skinny braces = sleeker vibes. Chunky ones? Well, hey, some people love that “industrial chic” look.
Cut your braces so they’ll fit snugly between the legs where you marked. Pop them in place, and screw them in tight—none of that half-hearted, wobbly nonsense. This step is what keeps your masterpiece from doing the cha-cha every time you set something on it.
Now, let’s talk upgrades. If you’re already in deep, why not toss in a shelf? Just take a board and lay it across those bottom braces. Boom—instant storage. It’s honestly wild how much handier your project gets with that one little addition. Think about it: a place to stash your hammer, that rogue screwdriver, or—let’s be real—the half-empty bag of potting soil you keep swearing you’ll use next spring. (No shame. We’ve all got one.)

6. Drainage: Don’t Skip This!
Flip that planter so it’s right side up—none of this upside-down nonsense. You want to see the bottom, that’s your target.
Now, grab yourself a ⅜" spade bit. Not familiar? It’s that flat, paddle-shaped drill bit that kinda looks like something a medieval dentist would use. Trust me, it’s way better for plastic than your standard twisty drill bit, which just melts the plastic and leaves behind some sad, gooey holes. You’re aiming for clean, crisp holes here—think Swiss cheese, not grilled cheese.
Drill about ten holes, spaced out across the base. Don’t just cluster them in the middle, either—spread ‘em around. Your future plant roots will thank you. It seems excessive, but you want water to drain quick, not hang around making your soil into a swamp.
And, look, if you’re tempted to skip this step because, “Oh, it’ll be fine, plants like a little water, right?”—just don’t. No drainage means your plants are basically sitting in a bathtub, and unless you’re growing water lilies, that’s a one-way ticket to root rot city. Even succulents, those supposed “desert survivors,” will just give up on life and turn to mush. It happens fast, too. One day they’re perky little guys, next day you’re poking a sad, soggy grave. Don’t do it.
So yeah, holes. Lots of them. Your plants will live longer and you’ll look like you actually know what you’re doing. Win-win.

7. Moving & Filling
Here’s the deal: once you load up that planter, it’s gonna weigh as much as a small car (okay, maybe not a car, but you get it). So before you start channeling your inner gardener, drag, scoot, or awkwardly shuffle your planter to its forever home. Back porch, balcony, middle of your lawn—wherever. If you fill it up first and then try to move it, you’re either pulling a muscle or dragging a trail of soil across your yard. Not a good look. Save yourself the workout and just get it where you want it now. Future you will high-five present you.
Time to bust out the gravel. You wanna throw in a chunky, uneven layer—not those sad little pebbles, go for the big stuff—about an inch thick. Make sure it’s covering all the drainage holes at the bottom. Why? Well, if you skip this, next time you water, half your dirt’s gonna run out the bottom and you’ll be left with a muddy, tragic mess. Not to mention your plants hate soggy roots. Picture gravel as the club’s bouncer—it blocks the dirt riffraff but lets the cool water breeze right through. If you’re feeling extra, you can use broken terracotta or even busted-up bricks. No fancy gravel? Improvise. Just don’t skip it.
Alright, now dump in your raised bed soil. Go for that fluffy, rich stuff if you can. Fill until you’re about three inches from the top—don’t overdo it, or every time you water, the soil will flood out like a mini landslide. While you’re at it, run your hands through the dirt, break up any stubborn clumps, and give it a good fluff. Plants hate compacted soil. It’s like trying to nap on a hardwood floor. Make a few little pockets or craters for your new seedlings—think of it as setting up the VIP section for your plant babies.

Get Planting!
Boom. That’s it—raised bed, mission freaking accomplished.
Alright, so here’s the deal—this is the fun zone. Seriously, toss in whatever your green-thumbed heart desires. Tomatoes? Always a classic. Basil? Smells so good you’ll want to stick your nose in the leaves every time you pass. Want flowers bursting everywhere? Go wild. Hot peppers? Only if you’re cool with living on the edge (and possibly sweating through your next salsa).
